Trekking Poles Made Simple
Learn how to adjust trekking poles, use the right technique on climbs and descents, and avoid common mistakes for a more comfortable hike.
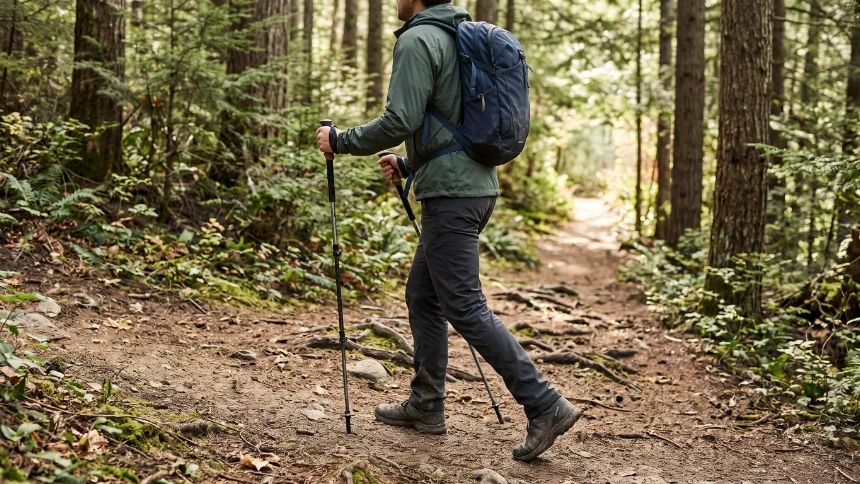
Trekking poles can make a long hike feel more manageable, especially when the trail climbs steeply, drops over uneven ground, or crosses slippery terrain. But poles are only helpful when they are adjusted properly and used with a natural rhythm. The goal is not to push yourself forward with every step. It is to improve balance, maintain a comfortable pace, and give your upper body a useful role on the trail.
If you have never used trekking poles before, you do not need complicated techniques to get started. A few basic adjustments and simple habits will help you feel more confident without making your walk feel awkward.
1. Set the Correct Pole Length
Start by adjusting both poles on relatively flat ground. Stand upright in your hiking shoes, relax your shoulders, and hold the grips with the tips resting on the ground beside your feet. Your elbows should bend at roughly a right angle.
This is a useful starting point, not a measurement you must follow perfectly. Your arm position, pole design, and personal comfort all matter. Walk a short distance and make small adjustments until your shoulders feel relaxed and your wrists stay in a natural position.
-
If your shoulders lift: The poles may be too long.
-
If you have to bend your elbows excessively: The poles may be too short.
-
If your wrists feel strained: Recheck both the length and how you hold the grips.
Adjust both poles to the same length for ordinary walking on level ground. If your poles have twist locks or lever locks, check that each section is securely fastened before putting your weight on them. Never extend a pole beyond its marked limit.
2. Get Comfortable With the Straps and Grips
The wrist straps help support your hands and distribute pressure, but they should not cut into your skin or restrict circulation. Follow the strap design supplied with your poles, since different manufacturers use different threading and adjustment systems.
Hold the grip without squeezing it tightly. A relaxed hand reduces unnecessary tension in your forearms and makes it easier to maintain a steady rhythm over several miles.
Practice on a flat, open path before tackling steep or technical terrain. Let the poles move with your arms rather than treating them like rigid supports that must be planted with force.
Beginner tip: Try walking for five to ten minutes on an easy path. Focus on a relaxed grip, quiet pole placement, and comfortable shoulder movement before worrying about speed.
3. Find a Natural Walking Rhythm
On straightforward trails, the simplest technique is to move each pole with the opposite foot. As your left foot steps forward, your right pole moves forward; as your right foot steps forward, your left pole moves forward.
This opposite-arm movement is similar to the natural swing of your arms when walking without poles. It helps you maintain balance without forcing you to think about every step.
-
Start walking at your usual comfortable pace.
-
Move one pole forward as the opposite foot advances.
-
Plant the pole lightly beside or slightly behind your forward foot.
-
Push back gently as your body moves forward.
-
Repeat on the other side without exaggerating your arm swing.
Your poles do not need to strike the ground at exactly the same moment as every footstep. On irregular trails, it is more important to place them securely and keep your movement balanced than to maintain a perfect pattern.
4. Adjust Your Technique for Uphill Trails
Climbing often requires shorter steps and a slightly different pole position. Shorten your poles a little if the slope makes your arms reach too high. Keep your torso comfortably upright, lean forward only as much as the terrain naturally requires, and avoid hunching your shoulders.
Plant the poles where they can provide useful support without forcing you to stretch. Push down and slightly backward as you move past them. On steep sections, you can place both poles ahead for additional balance, then step forward carefully.
Try not to rely on your arms to haul your entire body uphill. Your legs should still do most of the work. The poles help share some effort, improve stability, and give you extra points of contact.
5. Stay in Control on Descents
Going downhill can be harder on your knees and can make loose gravel, wet roots, or uneven rocks more difficult to negotiate. Lengthening your poles slightly may help you reach the ground comfortably ahead of you. Make adjustments gradually and test the result on a gentle slope first.
Place the tips securely before transferring weight, keep your steps controlled, and avoid leaning backward so far that you lose balance. The poles are there to help steady your movement, not to act as brakes that will always prevent a fall.
On a steep descent, move slowly enough to choose reliable footholds. If a section is exposed, very slippery, or requires both hands for scrambling, stow your poles when appropriate and use the safest technique for that terrain.
6. Handle Uneven Ground and Trail Obstacles
Roots, rocks, narrow paths, and shallow stream crossings call for deliberate pole placement. Aim for stable ground rather than placing a tip on a loose rock, a hollow between stones, or a slippery surface that may cause it to slide.
When crossing a small obstacle, use the poles to improve balance while keeping your feet in control. Do not assume that a pole will hold your full body weight. A tip can slip, a section can collapse if it is not locked correctly, and a basket can catch between rocks or roots.
For stream crossings, check the current, depth, and footing before proceeding. Use extra caution in moving water. Trekking poles can offer additional contact points, but they do not make an unsafe crossing safe.
7. Choose the Right Tips and Baskets
Trekking poles often come with rubber tips, carbide or metal tips, and interchangeable baskets. The best setup depends on the surface and the manufacturer’s recommendations.
| Trail condition | Useful setup | What to watch for |
|---|---|---|
| Rocky dirt trails | Standard trekking tips suitable for mixed terrain | Check that the tips grip securely and are not badly worn. |
| Pavement and hard paths | Compatible rubber tip covers, if recommended | Make sure covers are secure and do not slide off. |
| Soft ground or mud | Appropriate baskets that help limit sinking | Remove packed mud before it interferes with movement. |
| Snow | Suitable snow baskets designed for the poles | Do not expect ordinary small baskets to prevent deep sinking. |
There is no single tip setup that works perfectly everywhere. Check your pole manual before changing accessories, and replace damaged or excessively worn components before your next long hike.
8. Avoid These Common Beginner Mistakes
Planting the poles too far ahead
Reaching far forward can disrupt your stride and place your body in an awkward position. Keep pole placement close enough to maintain a natural walking rhythm, adjusting for the terrain when needed.
Gripping too tightly
A clenched hand can make your forearms tire quickly. Relax your fingers around the grips and use the straps as intended by the pole manufacturer.
Using the same length on every slope
A setting that feels right on level ground may be uncomfortable on a steep climb or descent. Make small adjustments when the terrain changes significantly.
Leaning heavily on the poles
Trekking poles can improve stability, but they are not a substitute for sound footing, suitable footwear, or careful route choices. Avoid putting sudden, excessive force on a pole, especially if it is planted on an uncertain surface.
Ignoring loose locks or damaged parts
A slipping pole section can cause a sudden loss of support. Check the locking mechanisms, grips, straps, shafts, and tips before setting off.
9. Keep Your Trekking Poles in Good Condition
A little care after each hike can help your poles remain reliable. Dirt and moisture left inside telescoping sections may contribute to corrosion, sticking, or wear, depending on the pole’s construction.
-
Wipe dirt and moisture from the shafts after your hike.
-
Follow the manufacturer’s instructions for cleaning telescoping or folding sections.
-
Allow wet components to dry before storing the poles for a long period.
-
Check locking mechanisms and tighten or adjust them according to the manual.
-
Inspect tips, baskets, straps, and grips for wear or damage.
-
Store the poles in a dry place away from unnecessary heat.
Do not apply oil or grease to locking mechanisms unless the manufacturer specifically recommends it. Some locks depend on friction, and unsuitable products can make them slip.
10. A Quick Check Before You Leave
-
Both poles are adjusted to a comfortable length.
-
All sections and locking mechanisms are secure.
-
Tips and baskets are suitable for the planned trail.
-
Grips and straps are comfortable and undamaged.
-
You have practiced basic pole placement on easy ground.
-
You know when to stow the poles for scrambling or other technical sections.
Make the Poles Work for You
The best trekking pole technique is one that feels steady, relaxed, and appropriate for the trail in front of you. Start with a comfortable adjustment, learn the opposite-arm walking rhythm, and change your approach for climbs, descents, and uneven ground.
Give yourself time to practice before relying on poles during a demanding hike. With a little experience and regular maintenance, they can become a useful part of your kit—helping you stay balanced, manage your pace, and enjoy more comfortable days outdoors.