How to Clean and Maintain a Camping Water Filter
Learn how to clean, backflush, dry, store, and protect a camping water filter from freezing or damage with simple maintenance steps for hikers and campers.
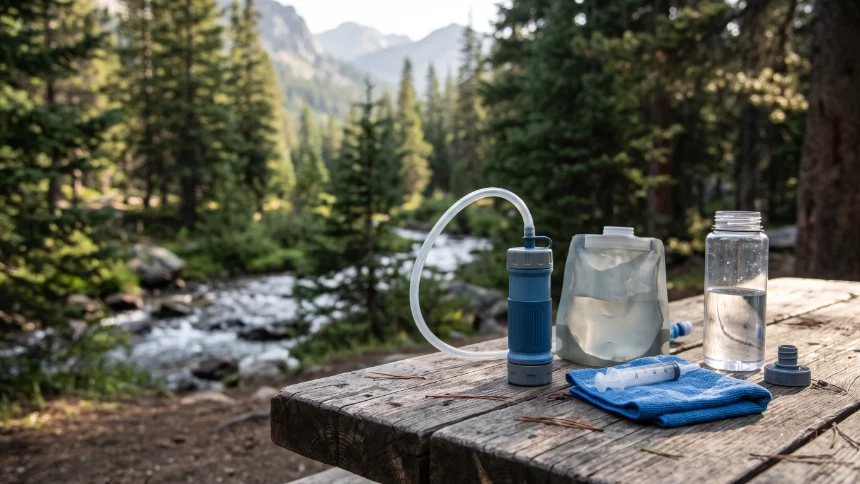
A camping water filter can be one of the most useful pieces of equipment in your pack, especially when a trip takes you away from reliable tap water. But after filtering muddy water, sitting in a damp bag, or spending a cold night outdoors, the filter may need more attention than a quick rinse.
Good maintenance helps preserve normal flow, reduces avoidable wear, and makes it easier to spot problems before your next trip. The exact routine depends on the filter design, so always use the manufacturer’s instructions for cleaning, backflushing, drying, and storage.
Quick Answer
Clean your camping water filter according to its manual, backflush only if the model supports it, rinse removable parts as directed, and let the components dry or store them exactly as instructed. Protect hollow-fiber filters from freezing, avoid household cleaners unless approved, and replace a filter that is damaged or no longer provides reliable performance.
1. Identify Your Water Filter Type First
Not every camping water filter is maintained in the same way. A squeeze filter, pump filter, gravity system, and purifier with an electronic component can have different cleaning procedures. Using the wrong method may damage the filter media or internal seals.
| Filter Type | Common Maintenance Need | Important Caution |
|---|---|---|
| Squeeze filter | Rinsing and backflushing when approved | Use only the specified direction, pressure, and accessories. |
| Pump filter | Cleaning the intake, hoses, and serviceable parts | Follow the manual before opening the housing or removing seals. |
| Gravity filter | Cleaning the filter element and checking hoses or connectors | Do not assume every model can be backflushed in the same way. |
| Purifier with electronic components | Cleaning approved surfaces and inspecting the power system | Do not immerse electrical components unless the manufacturer explicitly allows it. |
Check the product manual for the filter’s exact model name. If you no longer have the printed instructions, look for the manufacturer’s official online manual before attempting a deep clean.
2. Know When Your Filter Needs Cleaning
A filter does not necessarily need a full cleaning after every use. Some models can be rinsed or backflushed in the field, while others require only routine inspection until flow slows down or the manual recommends maintenance.
Pay attention to these signs:
-
Slower water flow: Sediment may be accumulating, although a damaged component can also affect performance.
-
Visible dirt around the intake: Mud, sand, and organic debris can obstruct the prefilter or other accessible parts.
-
Leaks around connections: Hoses, caps, seals, or connectors may be loose, dirty, worn, or damaged.
-
Unusual physical damage: Cracks, crushed housings, or damaged fittings need attention before the filter is used again.
-
Unusual odor or residue: Follow the manufacturer’s cleaning instructions rather than masking the smell with scented products.
Do not rely on water flow alone to determine whether a filter is safe. A filter can still pass water even when it has been damaged or has reached the end of its useful life.
3. Prepare a Simple Cleaning Kit
Most routine maintenance does not require a large collection of supplies. Start with the accessories recommended for your particular model.
| Item | Purpose | What to Avoid |
|---|---|---|
| Clean water | Rinsing approved external components and accessories | Assuming untreated source water is suitable for every cleaning step |
| Manufacturer-approved backflush tool | Removing trapped particles from compatible filters | Improvised tools or excessive pressure |
| Soft cloth | Wiping the exterior and drying accessible surfaces | Abrasive pads or rough scrubbing |
| Small soft brush | Removing loose dirt from approved external parts | Scrubbing delicate filter media or pushing dirt into openings |
| Clean storage container or bag | Keeping dry accessories together between trips | Sealing components while they are still wet when dry storage is required |
4. Clean the Filter Step by Step
Step 1: Disconnect and inspect the system
Separate the filter from its water bag, bottle, hoses, or other accessories if the design allows it. Remove loose dirt from the exterior and inspect the housing, connectors, caps, and accessible seals.
Do not dismantle a sealed filter cartridge simply to reach the internal media. If the manual describes the cartridge as non-serviceable, keep it intact.
Step 2: Remove loose dirt from the intake
If the intake screen or prefilter is removable, clean it according to the instructions. Gently remove visible sediment without forcing grit deeper into openings. Rinse only the parts that the manufacturer says can be rinsed.
For water collected from silty streams or shallow pools, clearing accessible debris before storage can help prevent dirt from remaining around the intake. Avoid using sharp tools to scrape away stubborn particles.
Step 3: Backflush only when the model supports it
Some squeeze and gravity filters can be backflushed to help dislodge trapped sediment. Other designs have different cleaning procedures, and some components must never be exposed to reverse pressure.
-
Confirm that backflushing is permitted in the manufacturer’s instructions.
-
Use the specified syringe, adapter, clean-water source, or other approved accessory.
-
Follow the stated direction and pressure limits.
-
Stop if the filter leaks, cracks, or behaves unexpectedly.
-
Check the flow again only after completing the recommended procedure.
Do not force water backward through a filter just because its flow has slowed. If the manual does not authorize backflushing, use the manufacturer’s approved cleaning or service process instead.
Step 4: Clean hoses, bottles, and connectors separately
Hoses, dirty-water bags, clean-water containers, and connector surfaces can collect sediment even when the filter element itself is functioning normally. Clean these parts according to their own care instructions and rinse away any permitted cleaning solution.
Keep the dirty-water side separate from the clean-water side. Avoid placing clean connectors on muddy ground or touching the clean outlet with dirty hands.
Step 5: Inspect the seals and fittings
Look for grit around O-rings, loose fittings, worn seals, and small cracks. Clean or lubricate seals only with products approved by the manufacturer. Some household oils and solvents can damage rubber or plastic components.
Replace damaged parts with compatible replacements rather than trying to compensate for a leak by tightening everything harder.
5. Drying Your Filter Without Damaging It
Drying instructions vary significantly between filter designs. Some products need to be drained and air-dried before storage, while others require a specific procedure to protect the internal filter media. Certain filters must be stored in a particular condition to prevent damage.
After cleaning:
-
Drain accessible water from the parts as directed in the manual.
-
Wipe exterior surfaces with a clean, soft cloth.
-
Leave removable accessories open or separated if the instructions recommend it.
-
Keep the equipment away from direct heat, open flames, and hot vehicle interiors.
-
Follow any special storage instructions for the filter cartridge itself.
Important: Do not assume that every filter should be completely dried in the same way. Some filter media have special storage requirements. Follow the model-specific instructions rather than applying a universal drying method.
6. Protect Your Water Filter From Freezing
Freezing is a particularly important concern for many hollow-fiber water filters. Water trapped inside the filter can expand as it freezes and damage the internal structure. That damage may not be visible from the outside.
If a hollow-fiber filter freezes or may have frozen, do not assume it is safe simply because water still flows through it. Follow the manufacturer’s inspection and replacement guidance. If the filter’s integrity cannot be confirmed, stop relying on it for drinking-water treatment.
Cold-weather habits that help
-
Check the forecast before a trip when temperatures may fall below freezing.
-
Follow the manufacturer’s instructions for carrying and protecting the filter in cold conditions.
-
Keep the filter from being left exposed overnight in freezing weather.
-
Do not use a stove, fire, or other direct heat source to thaw the filter.
-
When a filter has been exposed to freezing temperatures, assess its condition according to the manual before using it again.
Cold-weather storage rules differ by product. A method suitable for one model may not be suitable for another, so the manufacturer’s guidance takes priority.
7. Store the Filter Between Trips
After cleaning, make sure the filter and its accessories are stored in the condition specified by the manufacturer. A clean filter can still develop problems if it is packed carelessly, exposed to extreme temperatures, or left with damaged fittings.
| Storage Check | What to Do | Why It Matters |
|---|---|---|
| Filter body | Inspect for cracks, impact damage, and leaks. | Visible damage can indicate that the unit needs service or replacement. |
| Hoses and bags | Clean, drain, and store according to their care instructions. | Trapped dirt and moisture can create avoidable problems. |
| Caps and connectors | Keep them clean and together with the filter. | Missing or dirty fittings can complicate setup on the next trip. |
| Temperature | Choose a storage location within the manufacturer’s limits. | Extreme heat or freezing conditions may damage some components. |
| Storage instructions | Follow any special cartridge treatment or storage requirements. | Different filter technologies may need different long-term care. |
Keep the filter in a place where you can find it before your next trip. A small note on the storage bag can also remind you to inspect the equipment and pack any required cleaning accessories.
8. Common Water Filter Care Mistakes
Using bleach or household cleaners without approval
Strong cleaners can damage filter media, seals, plastics, or coatings. Do not disinfect or chemically clean the filter unless the manufacturer specifically approves the product and procedure.
Forcing water through a clogged filter
Excessive pressure can damage some filter elements and connections. Use the approved cleaning method and stop if the filter does not respond as expected.
Assuming clear water means safe water
Clear appearance does not prove that water is safe to drink. Filters differ in what they remove, and ordinary backpacking filters may not remove every virus, chemical contaminant, or dissolved substance. Choose a treatment method suitable for the source and follow the product’s stated capabilities.
Ignoring the manufacturer’s service life
Filters have limits that may depend on total use, water conditions, and the model. If a cartridge reaches its specified capacity or fails a required integrity check, cleaning it does not automatically restore it to safe working condition.
Putting a questionable filter back into service
If the unit has cracked, frozen contrary to its care requirements, leaked unexpectedly, or suffered an impact that may have damaged the filter element, do not rely on it until the manufacturer confirms the appropriate next step.
The CDC guide to water treatment outdoors explains why clear water can still contain germs and how treatment options differ.
9. When to Replace or Service Your Filter
Routine maintenance can remove sediment and keep compatible components working smoothly, but it cannot reverse every type of damage. Replacement or professional service may be necessary when the filter reaches its rated capacity or develops a fault.
Check the manufacturer’s guidance if you notice:
-
Persistent low flow after the approved cleaning procedure.
-
Cracks in the housing or damaged connection points.
-
Leaks that cannot be resolved by correctly fitting or replacing approved seals.
-
Possible freeze damage or an unsuccessful integrity test.
-
A cartridge that has reached its stated service limit.
-
Uncertainty about whether the filter can still provide its rated treatment.
Do not extend a filter’s service life simply because it looks clean. Follow the product’s rated capacity, maintenance schedule, and replacement criteria.
10. A Simple Pre-Trip Water Filter Checklist
Before leaving home, take a few minutes to confirm that your filter is ready. This is especially useful before a longer hike, a remote camping trip, or a journey in cold weather.
-
Check the filter housing and connections for cracks or damage.
-
Confirm that the filter has not been exposed to damaging freezing conditions.
-
Check the remaining service life or rated capacity if the model tracks it.
-
Clean or backflush the filter only if the manufacturer recommends it.
-
Inspect hoses, bags, caps, and seals.
-
Pack the correct cleaning accessories and any approved replacement parts.
-
Confirm that the filter is appropriate for the water sources and contaminants you may encounter.
-
Bring a backup water-treatment option when the route and conditions justify one.
Final Thoughts
A camping water filter does not need complicated maintenance, but it does need the right maintenance. Remove accessible dirt, use only approved cleaning procedures, protect vulnerable filters from freezing, and store each component as directed.
Most importantly, never treat cleaning as proof that a filter is still safe. Inspect the equipment, respect its service limits, and replace or service it when its condition is uncertain. A few careful checks at home can help you avoid discovering a problem when you are already far from the trailhead.